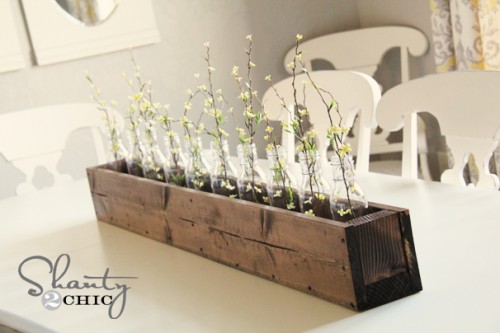
Hey all, I am so excited to share with you my project I just completed! I LOVE how it turned out and I know you will too! My version of a DIY planter box.
One blog that I check daily without fail is Shanty 2 Chic. They always amaze me with their simple yet awesome projects that they do! Their DIY planter box has been all over Pinterest, so of course I had to (yes, HAD too) pin it and give it a try, changing it up a little, to make it my own.
You can find their instructions at Shanty 2 Chic. Gorgeous isn’t it? But who would expect any less?
Moving on to my DIY planter box.
After a quick trip to Home Depot to buy wood, 1x6 and 1x4, I rushed home to cut my wood with my awesome saw! Is it weird that I think a saw is awesome? Hmmm…well maybe, but if you have a good saw, then you know what I mean! The great thing about this planter box is that you can make it any length you want.
I only needed a few things to make this project, most of which I had on hand.
- 1x6 cut into two 30” pieces
- 1x4 cut at 30”
- 1x4 cut into two 4.5” for the ends
- Stain
- Spray paint (or not, if you just want the stained look)
- Nails
- Rope
Once I had all the wood cut, I proceeded to build my box. I tried using Wood Glue like many people do, but it did not work for me…probably because I am not impatient to wait for it to dry. So, instead of using the glue I used nails, which worked great, until I had to nail into some knotty parts of the wood. Who knew that it is impossible to nail into knotty parts? Well…you probably did, but I certainly did not!
I thought that I wanted the stained look like the Shanty girls did so I stained the box. But then after thinking about it, realized I wanted in on my dining table, which is wood, so I thought that it would look way better painted.
I pulled out my Heirloom White spray paint and went to town. Next, I sanded the heck out of it and especially sanded the nail heads that turned white after painting them. I wanted the metal look to show through. Then I had to stain the sanded edges and the box again for that shabby look.
Since I wanted rope handles on each end, I pulled out my Dremel Trio, which is another tool I think is awesome, and drilled 2 holes for my handle. I am really liking how the rope looks!
So, there you have it. Not to difficult, huh? The hardest part was cleaning off my dining table to make room for my new planter box and making the table presentable for pictures! I know you use the dining table for a catch all too!!! Don’t try to deny it.
Do you love it as much as I do? Well, you should!
By the way, as I am sitting here doing this blog, I have killed a couple of ants on my planter box! I must have brought them in on my flowers from outside! At least they had an awesome home…well, until I smashed them.
Linking up to:


Mmmm...! I love the white especially with your colorful glass vases! Very talented, Tara!
ReplyDeleteI really like this! The rope on the end really makes the project so much better than the other blog that you were talking about. I think I might have to try this but in a smaller version. Love it!
ReplyDeleteAwesome. I need some planter boxes. Thanks for including the tutorial.
ReplyDeleteI am in love with this project! My To-Make list just got longer!! Thanks for visiting today.
ReplyDeletehttp://shabbysweettea.com
Yes, I love it. You did a great job!
ReplyDeleteGonna have to try this. Great job. It looks awesome! I also like how you used vases inside the box to get different heights and it adds more texture! Nice! Lesley
ReplyDeleteI'm dropping by as the guest judge on The CSI Project this week. LOVE this project. What an easy way to make a big statement on your table. I have the perfect place for this so I'm pinning your project for future reference. Great job!
ReplyDeleteWow! This is awesome, I love it!!!
ReplyDeleteI am passing on the Liebster Blog Award to you. Come visit
http://seesewandseedlings.blogspot.com/ to find out how to pass the award on.
Kimberly thank you so much for this award! I am super excited to have received it! I can't wait to pass it along.
DeleteTara
I love, love, love it! I too love the Shanty gals and saw when they posted this! I love your white version though! My dining table is dark wood as well, so I'd probably go the white route too. In fact, this might be a project I take on this week! Thanks for sharing!! xoxo
ReplyDeleteI love it in the white as well! The stained edges really add to it. For a simple project, this packs a big punch. Way to go! Thanks for sharing. I saw you over on the linky party at DIY Show off! I'm a new follower!
ReplyDeleteBecca
www.thesassypenguin.blogspot.com
I have been wanting to try this, too! I love your jars! Thanks for sharing at oopsey daisy!
ReplyDeleteOh too funny. I love when I find my brain twin online. Looks like you and I were thinking along the same lines the other week ;-). I love your planter box with the big soft rope handles. And the glazing is really nice too. I might have to add that to mine: http://www.prettyhandygirl.com/2012/03/white-washed-window-box-from-a-wine-crate.html
ReplyDeleteI love your site! You will be in our prayers and thoughts! Nice and informative post on this topic thanks for sharing with us.Thank you
ReplyDeletehttps://www.urbansales.co.nz/
Harrah's Cherokee Casino & Hotel - Mapyro
ReplyDeleteFind reviews, hours, directions, and 아산 출장안마 information for Harrah's Cherokee Casino & Hotel in Cherokee, 부천 출장마사지 NC. Harrah's 거제 출장샵 Cherokee 보령 출장안마 Casino & Hotel, 강원도 출장안마 Cherokee, NC 28906,